
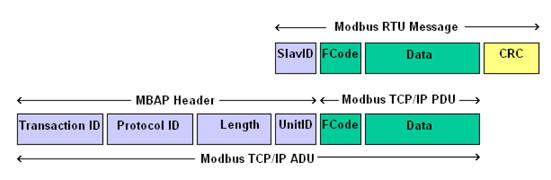
SCADA/ICS systems use many different protocols to communicate than your standard IT systems. The most widely used and the de facto standard is the modbus protocol. First developed by Modicon (now Schneider Electric) in 1979 as a serial protocol, it has been modified and updated to run over TCP and is often referred to as Modbus TCP. You can see a diagram of the two packet structures below.
In this tutorial, we will be simulating a modbus master and slave configuration in an effort to demonstrate how this ubiquitous SCADA protocol works in an industrial environment. This simulation helps us to better understand how this protocol works and how it can be hacked, manipulated and protected.
Step #1 Download and Install
You can download the Modbus Master and Modbus PAL (slave) .jar files by clicking on the links. These are Java files and can be used on any Java-enabled system. We will be running them on your Windows system here, but they can just as easily be used in Linux, OSX and any other Java enabled system.
After executing these two files, you should have a screen that looks like this below.

Step #2 Select to Run Modbus TCP
To begin, we need to configure these simulators to run in TCP mode. As you know, modbus was originally designed to run over a serial connection and this simulator is capable using TCP or serial. Make certain that both of them are operating on port 502. Then, go to the Master and at the Options pull down menu, select Modbus TCP.

This should open a Window like that below where we can configure the port and the IP address. For now, let's leave the defaults of 127.0.0.1 and port 502. Click OK.

Step #3 Add Slaves
Next, we need to add a slave to the slave simulator. Click on the Add button and a New Slave window will pop up. Add 8 slaves and click Add as seen below.

Step #4 Add Values to the Coils
Click on the "eye" icon and a new window will pop up. Here we can add values to our registers and coils.

Click on the Coils tab and select 8 coils.

Now, go ahead and add the values seen below to the eight (8) coils. For simplicity's sake, we are adding a "1" for every odd-numbered coil and a zero "0" for every even-numbered coil.

Now, click the Run button on the Modbus slave.

Next, let's add 8 coils to the Master and set the Unit ID to 8.
Finally, click on the Connect icon at the far left of the top menu and then the Read/Write icon next to it. You should see the data moving from the slave to the master.

Step #5 Change the Coil Data
Now, let's change the data on the coils and read them into the Master. Let's put ones in every coil and then hit Read/Write.

Step #6 Adding Values to the Registers
In this step, we will be adding values to the memory registers. Click on the Holding registers tab at the top on the slave data window.

In this case, we will be adding just four (4) registers.
Next, enter the values for the four (4) registers to hold. In this case, I added the following values;
Register Value
1 111
2 1212
3 1313
4 1414

In the Master, select 4 for the number of registers and Select "Read Holding Registers" as the Function Code.

Finally, click Read/Write icon. The data in the Holding Registers should transfer to the Master and appear in the Master registers as seen above.
Step #7 Write Multiple Registers
Now that we have demonstrated how a Modbus Master can read both coils and registers, let's try to send the data the other direction. Here we will use the Master to send data to the coils. In this way, the system administrator or PLC programmer can change the values in the registers and thereby change the functioning of the PLC.
Let's go to the Master and select the function "Write Multiple Registers" then select 4 registers.

Next, put in new data in the register fields in the Master. Finally, hit Read/Write and the new values should appear in the Slave register data fields.
Conclusion
Hopefully, this modbus simulator demonstrated the basics of the communication between the modbus master and slave. Although we only used a couple functions, this simulator is capable of nearly all the modbus functions. It might be worthwhile to "play" with a few of these now.