Digital Forensics, Part 1: Capturing a Forensically Sound Image
- OTW
- Sep 21, 2016
- 5 min read
Updated: Dec 31, 2022
Digital forensics is rapidly growing field of information security. The hacker needs to understand what evidence can be recovered and the security engineer needs to know how to find it.
These skills are applicable to law enforcement, corporate investigations, network intrusions, malware analysis and incident response, among many others. No matter what area of information security your are in or hope to join, skills in this field will prove invaluable, so let's get started.

Introduction
Before any forensic investigation or analysis can begin, a forensically sound image must be captured of the data storage device. These forensically sound images must be a bit-by-bit, physical copy of the device. Without such a copy, any evidence will likely be inadmissible in a court of law.
There are multiple ways to capture forensic image of a storage device. We will look a few of the most popular methods here.
Using Linux/UNIX dd command
The Linux dd command is built into nearly distribution of Linux. It simply copies a storage device bit-by-bit from a input or source file (if) to an output or destination file (of). We can use it here with our Kali, or for that matter any Linux distribution, to do this.
First, we need to find out how our USB flash drive is represented in the Linux operating system. We can do this by typing;
kali > fdisk -l
Our flash drive is represented as /dev/sdb1 in Linux. Since the 1 at the end represents the partition number and we want to capture the entire device, we can represent the flash drive as simply /dev/sdb.
To then capture the flash drive entirely, we simply need to invoke the dd command followed by the input file if=/dev/sdb and then the output file. This can be anything we want to name our output file. Here I will name it usbimage.dd.
kali > dd if=/dev/sdb of= usbimage.dd
After hitting enter, the dd command will begin to copy, bit-by-bit, the data from the USB drive to the file we designated usbimage.dd. If we want to check to see whether anything is actually happening, we can open another terminal window and type ls -l.

As we can see in the screenshot above, dd has begun the process of creating my forensically sound image.
dd represents the most basic of all image capture techniques and creates the foundation used in many other methods
Using dcfldd
A few years back, the Department of Defense Computer Forensics Lab (dcfl) developed of an open source version of dd specifically designed for creating forensic images. While the dd command is a generic command for copying storage devices, this command has options tailored for creating forensic images, but at its heart, it is still dd.
dcfldd has the capabilities to;
(1) hash the image on the fly
(2) a progress bar
(3) wiping disks
(4) verification that the new image is identical to the original
(5) simultaneous output to multiple files or disks
(6) logs and output can be piped to external applications
Like dd, dcfldd can ONLY produce raw images.
To create a forensically sound image of our USB flash drive, we can use dcfldd similarly to dd, but we have more options. So for instance, if we wanted to create a MD5 hash of the image (a good idea), we can type;
kali > dcfldd if=/dev/sdb of= usbimage2.dd hash=md5 hashlog=usbimage.log

Notice that dcfldd shows us the status of your imaging process, unlike dd.

When dcfldd has completed its imaging, it responds by telling how many blocks were written and how many blocks went in and how many blocks out.
Once the capture is complete, we can then check to see whether the images and log have been completed by typed ls -l.
kali > ls -l

As we can see, dcfldd created the image and also created the image log. Inside the image log should be the MD5 hash of the image. To see it, simply type;
kali > more usbimage.log

dcfldd is an excellent, if rudimentary, tool for creating forensically sound device images. Very few frills and no GUI, but fast and straightforward.
FTK Imager
The software developer, Access Data, sells a forensic suite known as the Forensic Tool Kit or FTK. As part of that suite of tools they have developed a tool known as the FTK Imager. This tool is designed specifically to create forensically sound images with a easy to use GUI. They have long provided this tool for free and as a result it has become the tool of choice in many forensic environments for creating forensically sound images.
You can download the FTK Imager at https://www.exterro.com/
After installing and executing FTK Imager, you will be greeted with a familiar interface like that below.

Note that like many Windows applications, it has the familiar top-line pull-down menus starting with "File".
Click on "File" and go to "Create Disk Image".

When you do, a window like the one below will open. Select "Physical Drive".

This will open another window asking you to select the source drive location. Here, I have selected "General USB Flash Disk". Yours may be slightly different.

Click "Finish" after selecting the device.
Next, you will prompted to enter the "Image Destination". Click "Add" . Note also that I have indicated in the lower left corner that I want the images verified after they are created.

You should then be prompted for the type of image you would like to create. Select a "Raw" or dd image.

After we have entered all that information about our image creation, FTK Imager will prompt us to create a case. The case creation process requires;
(1) a case number
(2) evidence number
(3) a unique description
(4) the examiners name
(5) notes

Fill in this form appropriately and hit "Next". We will next be prompted for the image destination. Here, I have created a folder specifically for forensic images named unimaginatively, c:\forensic images. I have also named the image file, "firstimage.dd".

Now, click "Finish". You will now be returned to the "Create Image" window. Click "Start".

FTK Imager will now begin the time consuming process of copying the device, bit-by-bit to the file you have designated.

When it has successfully completed, you will see it stop and in the status window you will see "Image created successfully". It will then begin to try to verify that that the newly created image is identical to the original. This can take awhile, so be patient.

Finally, when the image verification is complete, click on "Image Summary" and it will open a window of summary statistics on the image including the all important hashes like that below.
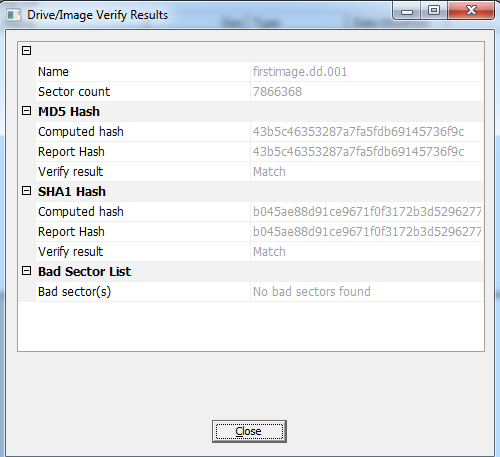
Success! We have created a forensically sound image of our USB device, verified that it identical to the original and generated both a MD5 hash and a SHA1 hash.
Conclusion
In this tutorial, we have created a forensically sound image using the three (3) most popular methods. This is usually the first step in any investigation and is critical to the overall success of the investigation. Without a good image, any further work invested in the investigation may be for naught.


